Letzte Änderung am 2012-05-27 22:59:12 von TheOne rewrite of USB stick creation (EN)
Erweiterungen:
Create a Kanotix USB boot stick
Content
- Requirements
- Linux method
- Windows method
- Additional information
This article was tested succesfully with the following Kanotix versions:
- Kanotix Excalibur
- Kanotix Hellfire
IMPORTANT: The instructions on this page will destroy all data currently on the USB stick being used. Please be certain it does not contain important information.
1. Requirements
Of course you need an USB stick with sufficient memory for the Kanotix ISO image. If you want to use persistent feature then you need even more memory for your personal data. You can use this instructions with all Kanotix hybrid ISO images.
2. Linux method
GUI method
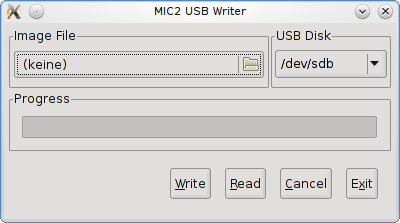
Download the Meego Image Creator (MIC). It is a nice python script with a GUI. Use the 3 following commands for download, set executable flag and starting it.
wget -qO- tinyurl.com/img-writer-gui|sed /os.geteuid/,+1d > img-writer-gui
chmod +x img-writer-gui
./img-writer-gui
Console method
Images made with iso-hybrid can be written to USB sticks with all tools that support RAW data copy, e.g. dd or cat. But this method is not supported, because you need to specify the target device on your own. The risk that you override another device is too big. If you know how to use these tools, no problem you can use them.
3. Windows method
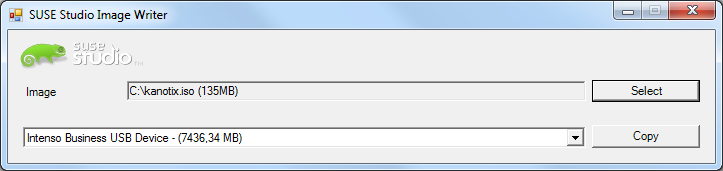
Download the (SuSE) ImageWriter http://kanotix.acritox.com/files/ImageWriter.exe∞ (require M$ .NET Runtime)
It is very easy, select your ISO image and the target USB stick.
4. Additional information
If your computer bios does not support booting from USB devices, then you can take a look to Plop boot manager. One of its feature is USB boot without bios support. http://www.plop.at/en/bootmanagers.html∞
Löschungen:
Booting KANOTIX from a USB-Stick
I wanted to boot my new KANOTIX versions from a USB stick and furthermore, to save my data on the USB stick (also under Windows). However, I wanted to change as little as possible from the CD version. Since this might interest other Linux fans, you will find below a short description of the variant I run:
Caution with the drive designation!
My computer mounts the USB stick as /dev/sda1 under /media/sda1, when the stick is put in before booting (test in root terminal with the "mount" command). This will possibly be different on other computers (/dev/sdb1, /dev/sdc1), if a SCSI drive is present.
Use extreme caution when partitioning and formatting the drive, to use the right one. Current data on the partition will be irremediably lost. I also give no guarantee as for the accuracy of the the actions described here. There is a risk involved in everything we do.
Conditions:
- BIOS must allow USB booting. Most computers offer a menu selection, which includes USB stick, by pressing the <F8>, <F11>, <F12> or other function key at boot.
- USB stick with at least 1 GByte memory
Procedure: (All commands must be typed from a root terminal.)
Partitioning the USB stick:
- use only a primary partition with "fdisk /dev/sda2?"
- type of partition "C" W95 FAT32 LBA)
- delete any existing partitions before creating
- format the USB-Stick with vfat: "mkfs.vfat /dev/sda1"
Copy the KANOTIX CD onto the USB stick
- first copy the /boot directory from the CD: "cp -Rvf /media/cdrom1?/boot /media/sda1/" (otherwise, the sectors are outside the bootable range of my computer's BIOS)
- then the rest and install the GRUB bootloader on the USB stick:
cp -vf /mnt/cdrom1/* /media/sda1
cp -Rvf /mnt/cdrom1/KNOPPIX /media/sda1/
grub-install --root-directory=/media/sda1 /dev/sda
Customize the GRUB menu to be able to start automatically from the USB stick:
"vi /media/sda1/boot/grub/menu.lst"
Add the following lines or change accordingly:
#line 7, manual modification for usb stick boot
gfxmenu (hd0,0)/boot/grub/message
#gfxmenu (cd)/boot/grub/message
#line 39, manually added for usb stick boot
title  ACPI on - DMA on - English for usb-stick boot
kernel (hd0,0)/boot/vmlinuz ramdisk_size=100000 init=/etc/init lang=us  \
 apm=power-off nomce quiet bootusb2 fromhd=/dev/sda1
initrd (hd0,0)/boot/miniroot.gz
[Changes concerning additional kernel parameter: "bootusb2 fromhd=/dev/sda1" to load instead the USB kernel module together with the boot device and including and GRUB device designation (hd0,0) instead (CD).
For testing purpose you can make the changes at boot using the GRUB command line. Possibly the English key layout is active, so here are the most important keys :
<'> corresponds to <=>, <-> corresponds to </>, <(> corresponds to <*>]
Reference for the drive notation from GRUB designation for the USB stick partition (on my computer) (hd0,0):
In the GRUB command line mode, the drive designation can be found, for example, with the "find" command.
At the USB Stick boot (possibly with <F8> key), leave the GRUB graphic mode (with the <ESC>-key)
In GRUB Text Mode, type "c" to get a command line
Find and display all partitions containing the filename "vmlinuz" with "find /boot/vmlinuz"
(on my computer (hd0,0) for the USB Stick and more
(hd1,3)... for other Linux Installation on the hard drive).
Get back to the Text or Graphic mode with <ESC>
And soon it is ready to go:
Put the USB stick in,
when the BIOS boots up use the <F8> function key to display all boot devices,
select USB stick as boot device and
finish loading the operating system.
Alternative method using the complete ISO image on the USB stick
With the previous method, you don't get to keep the ISO image, unfortunately, so you can't be able to burn it later on CD. Consequently, here is another easily modified way, in which the complete ISO image is copied on the USB stick.
Partition and format the USB Stick as explained above.
Copy the boot directory:
The ISO image must be mounted on that directory over the Loop device:
mount -o loop -t iso9660 /Path_to_ISO-Image/KANOTIX.iso /media/test
cp -vR /media/test/boot /media/sda1/
umount /media/test
Copy the ISO image onto the USB stick. (This time, it's not the content of the CD you will copy, but the complete ISO image itself instead.)
cp -v /Path_to_ISO-Image/KANOTIX-BUG-HUNTER-X-2004.iso /media/sda1
Install the GRUB bootloader on the USB Stick (as described above)
Edit the GRUB menu (same as above) -
"vi /mnt/sda1?/boot/grub/menu.lst" and add the following lines or change them accordingly:
#line 7, manual modification for usb stick boot
gfxmenu (hd0,0)/boot/grub/message
#gfxmenu (cd)/boot/grub/message
#line 39, manual addition for usb stick boot
title  ACPI on - DMA on - English for usb stick boot
kernel (!hd0,0)/boot/vmlinuz ramdisk_size=100000 init=/etc/init lang=us \
 apm=power-off nomce quiet bootusb2 fromhd=/dev/!sda1 fromiso=/*.iso
initrd (!hd0,0)/boot/mini:
(only the kernel parameter "fromiso=/*.iso" was added)
And we're in business again! Reboot from the USB stick....
All of the present Wiki page have been written from my system booted directly from the USB stick. Owing to the internet connection over a DSL router with DHCP/IP assignment, I need no further configuration to get to the internet.
I would be grateful to get feedback about how clear is the explanation, about errors or alternative configuration.
Category ContributedOldWikiEn
Editiert am 2007-02-02 13:21:21 von Boregard mount and cp were on one line
Erweiterungen:
%%mount -o loop -t iso9660? /Path_to_ISO-Image/KANOTIX.iso /media/test
cp -vR /media/test/boot /media/sda1?/
Löschungen:
%%mount -o loop -t iso9660? /Path_to_ISO-Image/KANOTIX.iso /media/test
cp -vR \
/media/test/boot /media/sda1/
Editiert am 2006-08-08 17:55:56 von Richard
Erweiterungen:
%%mount -o loop -t iso9660? /Path_to_ISO-Image/KANOTIX.iso /media/test
cp -vR \
/media/test/boot /media/sda1/
Löschungen:
%%mount -o loop -t iso9660? /Path_to_ISO-Image/KANOTIX.iso /media/test
cp -vR /media/test/boot /media/sda1/
Editiert am 2006-08-08 17:54:40 von Richard
Erweiterungen:
kernel (hd0?,0)/boot/vmlinuz ramdisk_size=100000 init=/etc/init lang=us \
apm=power-off nomce quiet bootusb2? fromhd=/dev/sda1?
kernel (hd0,0)/boot/vmlinuz ramdisk_size=100000 init=/etc/init lang=us \
apm=power-off nomce quiet bootusb2? fromhd=/dev/sda1 fromiso=/*.iso
Löschungen:
kernel (hd0?,0)/boot/vmlinuz ramdisk_size=100000 init=/etc/init lang=us apm=power-off nomce quiet bootusb2? fromhd=/dev/sda1?
kernel (hd0,0)/boot/vmlinuz ramdisk_size=100000 init=/etc/init lang=us apm=power-off nomce quiet bootusb2? fromhd=/dev/sda1 fromiso=/*.iso
Editiert am 2006-08-08 17:51:15 von Richard proofing
Erweiterungen:
I wanted to boot my new KANOTIX versions from a USB stick and furthermore, to save my data on the USB stick (also under Windows). However, I wanted to change as little as possible from the CD version. Since this might interest other Linux fans, you will find below a short description of the variant I run:
My computer mounts the USB stick as /dev/sda1 under /media/sda1, when the stick is put in before booting (test in root terminal with the "mount" command). This will possibly be different on other computers (/dev/sdb1, /dev/sdc1), if a SCSI drive is present.
Use extreme caution when partitioning and formatting the drive, to use the right one. Current data on the partition will be irremediably lost. I also give no guarantee as for the accuracy of the the actions described here. There is a risk involved in everything we do.
- BIOS must allow USB booting. Most computers offer a menu selection, which includes USB stick, by pressing the <F8>, <F11>, <F12> or other function key at boot.
- USB stick with at least 1 GByte memory
Procedure: (All commands must be typed from a root terminal.)
Partitioning the USB stick:
- use only a primary partition with "fdisk /dev/sda2?"
- type of partition "C" W95 FAT32 LBA)
- delete any existing partitions before creating
- format the USB-Stick with vfat: "mkfs.vfat /dev/sda1"
Copy the KANOTIX CD onto the USB stick
- first copy the /boot directory from the CD: "cp -Rvf /media/cdrom1?/boot /media/sda1/" (otherwise, the sectors are outside the bootable range of my computer's BIOS)
- then the rest and install the GRUB bootloader on the USB stick:
Customize the GRUB menu to be able to start automatically from the USB stick:
"vi /media/sda1/boot/grub/menu.lst"
Add the following lines or change accordingly:
[Changes concerning additional kernel parameter: "bootusb2 fromhd=/dev/sda1" to load instead the USB kernel module together with the boot device and including and GRUB device designation (hd0,0) instead (CD).
For testing purpose you can make the changes at boot using the GRUB command line. Possibly the English key layout is active, so here are the most important keys :
<'> corresponds to <=>, <-> corresponds to </>, <(> corresponds to <*>]
At the USB Stick boot (possibly with <F8> key), leave the GRUB graphic mode (with the <ESC>-key)
Find and display all partitions containing the filename "vmlinuz" with "find /boot/vmlinuz"
(on my computer (hd0,0) for the USB Stick and more
(hd1,3)... for other Linux Installation on the hard drive).
And soon it is ready to go:
Put the USB stick in,
when the BIOS boots up use the <F8> function key to display all boot devices,
select USB stick as boot device and
finish loading the operating system.
Partition and format the USB Stick as explained above.
Copy the boot directory:
The ISO image must be mounted on that directory over the Loop device:
Copy the ISO image onto the USB stick. (This time, it's not the content of the CD you will copy, but the complete ISO image itself instead.)
Edit the GRUB menu (same as above) -
"vi /mnt/sda1?/boot/grub/menu.lst" and add the following lines or change them accordingly:
Category ContributedOldWikiEn
Löschungen:
I wanted to boot my new KANOTIX versions from a USB stick and furthermore, to save my data on USB stick (also under Windows). However, I wanted to change as little as possible from the CD version. Since this might necessarily also interests other Linux fans, you will find below a short description of the variant I run:
My computer mounts the USB stick as /dev/sda1 under /media/sda1, when the stick is put in before booting (test in root terminal with the "mount" command).
This will possibly be different other computers (/dev/sdb1, /dev/sdc1), if e.g. SCSI drive are present. Therefore use extreme caution when partitioning and formatting the drive to use the right one. Current data on the drive will be irremediably lost.
I also give no guarantee as for the accuracy of the the actions described here. There is a risk involved in everything we do.
The BIOS must allow USB booting. (My computer offers a menu selection which includes USB stick, among other things, by pressing the < F8> function key at boot)
USB stick with at least 1 GByte memory
Procedure:
(All given commands must be typed from a root terminal.)
Partitioning the USB stick: -- use only a primary partition with "fdisk /dev/sda": type of partition "C" W95 FAT32 LBA). If necessary, delete existing partitions before.
Format the USB-Stick with vfat:
Copy the KANOTIX CD on the USB stick: first copy the /boot directory from the CD:
cp -Rvf /media/cdrom1/boot /media/!sda1/
(otherwise the sectors are outside of the bootable range of my computer's BIOS of my computer) then the rest and install the GRUB bootloader on the USB stick
Customize the GRUB menu to be able to start automatically from the USB stick "vi /media/sda1/boot/grub/menu.lst" and add the following lines or change accordingly:
[Changes concerning additional kernel parameter : "bootusb2 fromhd=/dev/sda1" to load instead the USB kernel module together with the boot device and including and GRUB device designation (hd0,0) instead (CD).-- For testing purpose you can make the changes at boot using the GRUB command line. Possibly the English key layout is active, so here are the most important keys : <'> corresponds to <=>, <-> corresponds to </>, <(> corresponds to <*>]
At the USB Stick boot (possibly with the <F8> key), leave the GRUB graphic mode (with the <ESC>-key)
Find and display all partitions containing the filename "vmlinuz" with the command "find /boot/vmlinuz" (on my computer (hd0,0) for the USB Stick and more (hd1,3)... for other Linux Installation on the hard drive).
And soon it can go:
Put the USB stick in, when the BIOS boots up use the < F8> function key to display the boot devices, select USB stick as boot device and finish loading the operating
system.
Partition and format the USB Stick as explained above..
Copy the boot directory
The ISO image must be mounted on that directory over the Loop device.:
Copy the ISO image on the USB stick.
(This time, it's not the content of the CD you will copy, but the complete ISO image itself instead.)
Edit the GRUB menu (same as above) -vi /mnt/sda1?/boot/grub/menu.lst and add the following lines or change them accordingly:
Category ContributedOldWikiEn
älteste bekannte Version dieser Seite wurde bearbeitet am 2006-06-18 12:56:32 von cokeinthebottle [ taken from the old one which name was not wikki-conform ]
Booting KANOTIX from a USB-Stick
I wanted to boot my new KANOTIX versions from a USB stick and furthermore, to save my data on USB stick (also under Windows). However, I wanted to change as little as possible from the CD version. Since this might necessarily also interests other Linux fans, you will find below a short description of the variant I run:
Caution with the drive designation!
My computer mounts the USB stick as /dev/sda1 under /media/sda1, when the stick is put in before booting (test in root terminal with the "mount" command).
This will possibly be different other computers (/dev/sdb1, /dev/sdc1), if e.g. SCSI drive are present.
Therefore use extreme caution when partitioning and formatting the drive to use the right one. Current data on the drive will be irremediably lost.
I also give no guarantee as for the accuracy of the the actions described here. There is a risk involved in everything we do.
Conditions:
The BIOS must allow USB booting. (My computer offers a menu selection which includes USB stick, among other things, by pressing the < F8> function key at boot)
USB stick with at least 1 GByte memory
Procedure:
(All given commands must be typed from a root terminal.)
Partitioning the USB stick: -- use only a primary partition with "fdisk /dev/sda": type of partition "C" W95 FAT32 LBA). If necessary, delete existing partitions before.
Format the USB-Stick with vfat:
Copy the KANOTIX CD on the USB stick: first copy the /boot directory from the CD:
cp -Rvf /media/cdrom1/boot /media/!sda1/
(otherwise the sectors are outside of the bootable range of my computer's BIOS of my computer) then the rest and install the GRUB bootloader on the USB stick
cp -vf /mnt/cdrom1/* /media/sda1
cp -Rvf /mnt/cdrom1/KNOPPIX /media/sda1/
grub-install --root-directory=/media/sda1 /dev/sda
Customize the GRUB menu to be able to start automatically from the USB stick "vi /media/sda1/boot/grub/menu.lst" and add the following lines or change accordingly:
#line 7, manual modification for usb stick boot
gfxmenu (hd0,0)/boot/grub/message
#gfxmenu (cd)/boot/grub/message

#line 39, manually added for usb stick boot
title  ACPI on - DMA on - English for usb-stick boot
kernel (hd0,0)/boot/vmlinuz ramdisk_size=100000 init=/etc/init lang=us apm=power-off nomce quiet bootusb2 fromhd=/dev/sda1
initrd (hd0,0)/boot/miniroot.gz
[Changes concerning additional kernel parameter : "bootusb2 fromhd=/dev/sda1" to load instead the USB kernel module together with the boot device and including and GRUB device designation (hd0,0) instead (CD).-- For testing purpose you can make the changes at boot using the GRUB command line. Possibly the English key layout is active, so here are the most important keys : <'> corresponds to <=>, <-> corresponds to </>, <(> corresponds to <*>]
Reference for the drive notation from GRUB designation for the USB stick partition (on my computer) (hd0,0):
In the GRUB command line mode, the drive designation can be found, for example, with the "find" command.
At the USB Stick boot (possibly with the <F8> key), leave the GRUB graphic mode (with the <ESC>-key)
In GRUB Text Mode, type "c" to get a command line
Find and display all partitions containing the filename "vmlinuz" with the command "find /boot/vmlinuz" (on my computer (hd0,0) for the USB Stick and more (hd1,3)... for other Linux Installation on the hard drive).
Get back to the Text or Graphic mode with <ESC>
And soon it can go:
Put the USB stick in, when the BIOS boots up use the < F8> function key to display the boot devices, select USB stick as boot device and finish loading the operating
system.
Alternative method using the complete ISO image on the USB stick
With the previous method, you don't get to keep the ISO image, unfortunately, so you can't be able to burn it later on CD. Consequently, here is another easily modified way, in which the complete ISO image is copied on the USB stick.
Partition and format the USB Stick as explained above..
Copy the boot directory
The ISO image must be mounted on that directory over the Loop device.:
mount -o loop -t iso9660 /Path_to_ISO-Image/KANOTIX.iso /media/test---cp -vR /media/test/boot /media/!sda1/
umount /media/test
Copy the ISO image on the USB stick.
(This time, it's not the content of the CD you will copy, but the complete ISO image itself instead.)
cp -v /Path_to_ISO-Image/KANOTIX-BUG-HUNTER-X-2004.iso /media/sda1
Install the GRUB bootloader on the USB Stick (as described above)
Edit the GRUB menu (same as above) -vi /mnt/
sda1?/boot/grub/menu.lst and add the following lines or change them accordingly:
#line 7, manual modification for usb stick boot
gfxmenu (hd0,0)/boot/grub/message
#gfxmenu (cd)/boot/grub/message

#line 39, manual addition for usb stick boot
title  ACPI on - DMA on - English for usb stick boot
kernel (!hd0,0)/boot/vmlinuz ramdisk_size=100000 init=/etc/init lang=us apm=power-off  nomce quiet bootusb2 fromhd=/dev/!sda1 fromiso=/*.iso
initrd (!hd0,0)/boot/mini:
(only the kernel parameter "fromiso=/*.iso" was added)
And we're in business again! Reboot from the USB stick....
All of the present Wiki page have been written from my system booted directly from the USB stick. Owing to the internet connection over a DSL router with DHCP/IP assignment, I need no further configuration to get to the internet.
I would be grateful to get feedback about how clear is the explanation, about errors or alternative configuration.
Category
ContributedOldWikiEn


Letzter Editor :
Eigentümer :